Before you start download Dog Breeds Image Dataset from kaggle for training
1. Prepare Test Dataset
For preparing the test data, I moved 20% (see Testing Data section) of the images out of training data by running this script. Or, you can download other data set from Kaggle or HuggingFace kind of websites.
You might want to run
brew install coreutilsto be able to run this script
#!/bin/bash

# prepare-test-data.sh
# This script moves 20% of each breed training data to testing data directory.

TRAIN_DIR="./Dataset-DogBreedsTrain"
TEST_DIR="./Dataset-DogBreedsTest"

mkdir -p "$TEST_DIR"

# Loop through each breed folder
for breed in "$TRAIN_DIR"/*; do
    if [ -d "$breed" ]; then
        breed_name=$(basename "$breed")
        mkdir -p "$TEST_DIR/$breed_name"

        # Count images
        total=$(ls "$breed" | wc -l)
        test_count=$(( total / 5 ))   # 20%

        # Randomly pick files and move them
        ls "$breed" | shuf | head -n "$test_count" | while read file; do
        	# Move it instead of copying.
            mv "$breed/$file" "$TEST_DIR/$breed_name/"
        done

        echo "Moved $test_count images from $breed_name"
    fi
done

echo "Done preparing test data."
Upon running the script, you should see similar output.
Moved 26 images from affenpinscher
Moved 25 images from afghan_hound
Moved 33 images from african
Moved 37 images from airedale
...
...
Moved 32 images from whippet
Moved 29 images from yorkshire_terrier
2. Verify the Test Dataset
If you observed the training dataset folders, some have less than 5 images. That means 20% of which would be no data. So, some of the folders in test dataset would be empty. You can find them by running the below command.
find Dataset-DogBreedsTest/ -type d -emptyIn my case, the following folders/breeds do not have any test data.
Dataset-DogBreedsTest/indian_pariah
Dataset-DogBreedsTest/dalmatian
Dataset-DogBreedsTest/indian_chippiparai
Dataset-DogBreedsTest/welsh_terrier
Dataset-DogBreedsTest/swedish_danish
Dataset-DogBreedsTest/indian_bakharwal
Dataset-DogBreedsTest/cotondetulear
Dataset-DogBreedsTest/sharpei
Dataset-DogBreedsTest/germanlonghair_pointer
Dataset-DogBreedsTest/english_mastiff
Dataset-DogBreedsTest/indian_gaddi
Dataset-DogBreedsTest/indian_spitz
Dataset-DogBreedsTest/indian_greyhound
Dataset-DogBreedsTest/labradoodle
Dataset-DogBreedsTest/indian_sheepdog
Dataset-DogBreedsTest/kombai
Dataset-DogBreedsTest/plott_hound
Dataset-DogBreedsTest/medium_poodle
Dataset-DogBreedsTest/lapphund_finnish
Dataset-DogBreedsTest/indian_mudhol
Dataset-DogBreedsTest/indian_mastiff
Dataset-DogBreedsTest/norwegian_buhund
So, we ran into Class Imbalance and Data Sparsity.
- Run this script to find small classes (few images)
#!/bin/bash
# detect-small-classes.sh

DATASET_DIR="./Dataset-DogBreedsTrain"
THRESHOLD=20   # change this to whatever you want

for class in "$DATASET_DIR"/*; do
    if [ -d "$class" ]; then
        count=$(find "$class" -type f | wc -l)
        if [ "$count" -lt "$THRESHOLD" ]; then
	        # `:` for doing cut or awk operations
            echo "$count:$class"
        fi
    fi
done

echo "Done."
Running the above script would give you list of the classes/directories that have fewer than THRESHOLD number of images.
Finding folders with less than 20 images...
       6:akita
      15:australian_cattledog
       9:bichon_frise
       ...
       ...
       4:swedish_danish
       6:tervuren
       1:welsh_terrier
Done.
Run this below steps on the original (untouched) dataset that you downloaded from Kaggle.
- Let us move the above classes out of our training data
bash detect-small-classes.sh | cut -d: -f2 | xargs -I {} mv {} classes-with-fewer-images/- Now that we moved classes with fewer images out of training dataset, run the
prepare-test-data.sh.
Now that we have good Training and Test datasets, let us move to Create ML app and build a model to detect dog breeds.
3. Start with a Create ML Project
- Open Create ML app (Xcode > Open Developer Tool… > Create ML)
- Choose Image Classification template (File > New Project > Image Classification)
- Fill the Project details
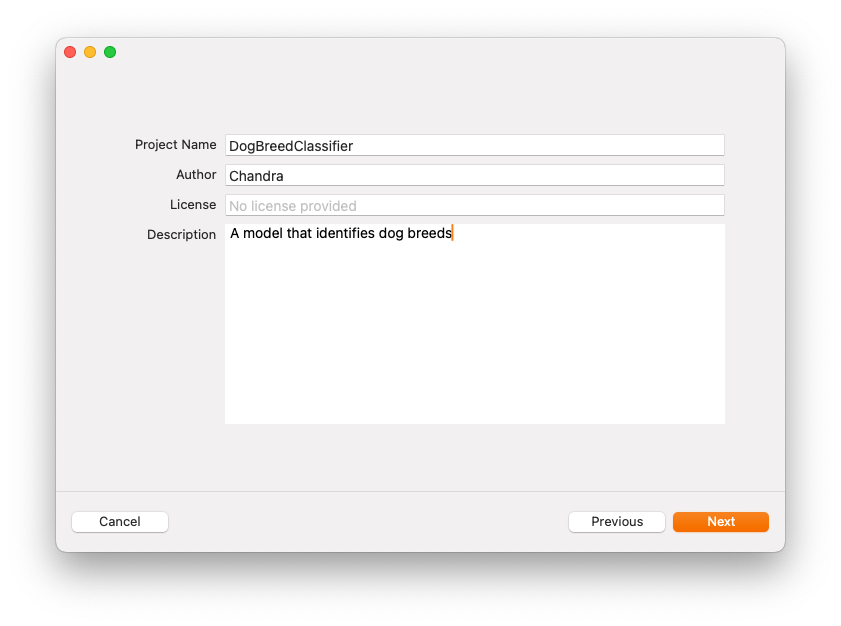
- Click Next and save project at a disc-location
4. Training the Model
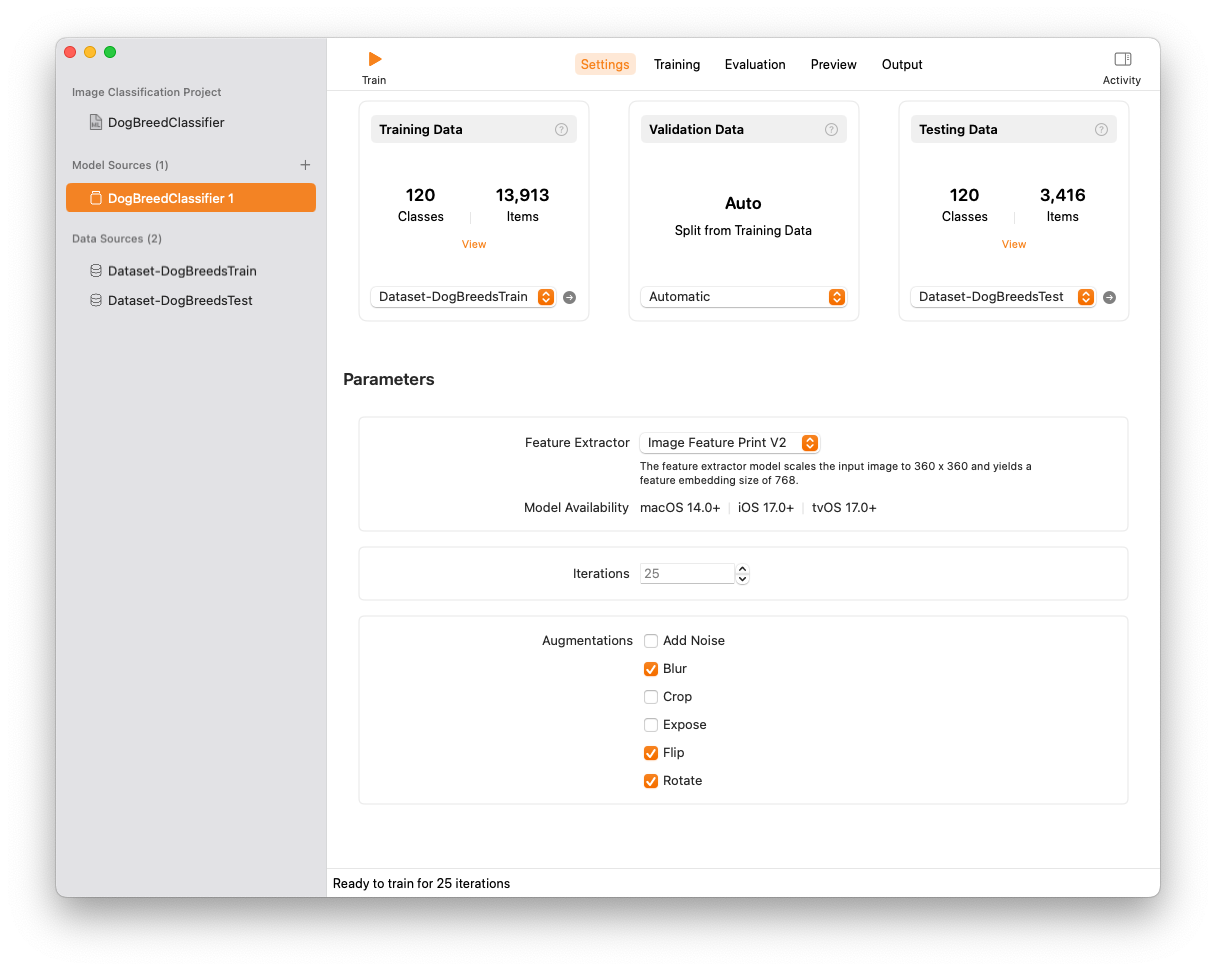
- The Data section:
- On the Training Data cell, choose the location of the dataset and you will see Create ML automatically finding
~120classes and~13,900items. - Leave the Validation Data as Automatic.
- On the Testing Data cell, choose the location of the dataset that we prepared. And, it would be
120classes and~3,400items.
- On the Training Data cell, choose the location of the dataset and you will see Create ML automatically finding
- The Parameters section:
- Feature Extractor:
Image Feature V1supports older operating systems, but results in larger output, slower training and higher memory usage. So, let us use Image Feature V2. - Iterations: Leave it as
25 - Augmentations: You can experiment with all the options. I am going to choose Blur, Flip and Rotate. FYI, the more Augmentations you choose, the more training time it will take.
- Feature Extractor:
Once you have your parameters set, go ahead and click on the Train button on top. Give your Mac sometime to train the model.
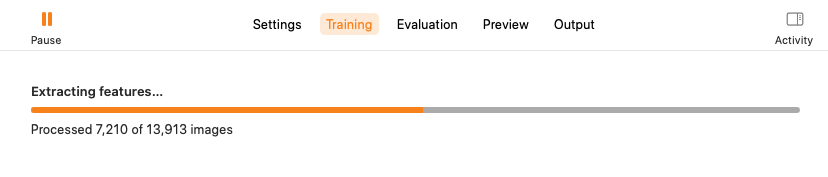
It is good time also to check your Activity Monitor for checking the load on the CPU. The training time depends on the dataset size, parameters and number of iterations.
After it finishes the training, the accuracy graph would be displayed.
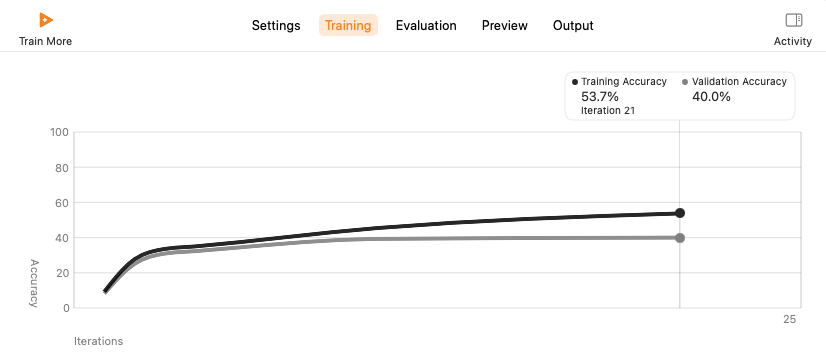

Analysis of the first training
Training Accuracy
- At around iteration
21, the accuracy is53.7%. The training curve rises gradually but became flat very early. This means the model is learning, but not very deeply. - As training accuracy is not super high, there is no sign of overfitting.
Validation Accuracy
- At iteration
21, it is40%. - The validation curve is consistently lower than training. And, the curve is relatively flat. This means poor generalization.
Test Accuracy
- Test Accuracy being
62%in first pass is decent. That means the model predicted the breed of a dog 62% of the test cases. - Top Confusion: The model predicted
EskimoasHusky. This is a case of Semantic Overlap. This happens because these breeds share visual traits such as fur texture, color and build etc.
Conclusion of first training
- 62% accuracy is decent.
- Underfitting
- Both training and validation accuracies are low
- The model hasn’t captured enough information from the data
- Possible Causes:
- Not enough training data per class.
- Input images might be too noisy (?)
You can go back and try changing parameters, iterations etc.
5. Testing the Model
Now, the fun part!

- Click on the
+button at the bottom - Pick an image from the Testing Dataset.
You would see our classifier gives list of possible breeds with percentage-confidence.
- Beagle: 52% confidence
- Basset Hound: 17% confidence
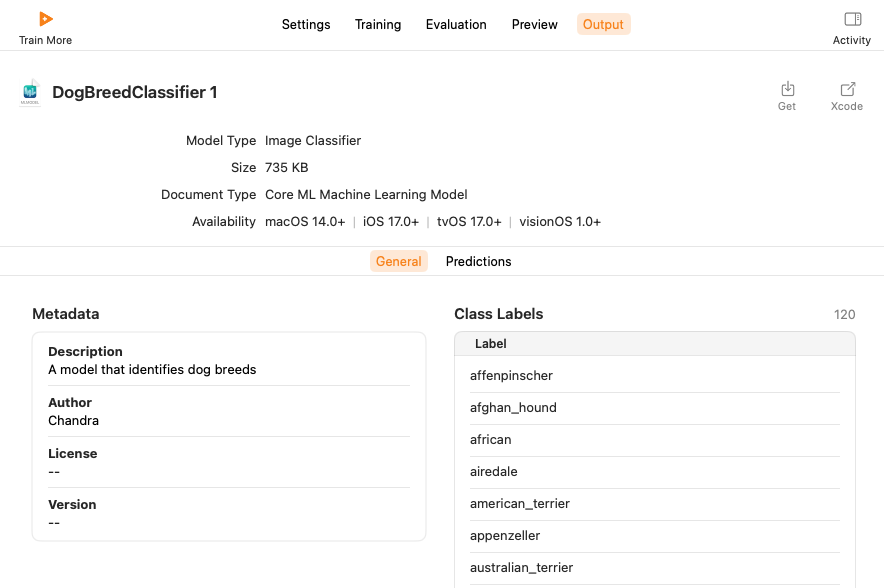
6. Save the Model
Save the model by clicking on Get button so that you can use it in your projects.
7. Build an app using the Model
Even funnier part, now!
- Go ahead and create an iOS or Multiplatform Project on Xcode.
- Add below Keys in Project Info
- Privacy - Camera Usage Description
- Privacy - Photo Library Additions Usage Description
- Create a folder called Model and add our
.mlmodelfile to it. - Add a file
ImageClassifierViewModel.swift
import SwiftUI
import Combine
import Vision

@MainActor
class ImageClassifierViewModel: ObservableObject {
    @Published var classificationLabel: String = ""
    @Published var confidence: String = ""

    public func classify(image: UIImage) {
        guard let ciImage = CIImage(image: image) else {
            classificationLabel = "Unable to process image."
            return
        }

        Task {
            let handler = VNImageRequestHandler(ciImage: ciImage, orientation: .up)
            do {
                try handler.perform([classificationRequest])
                processClassifications(for: classificationRequest, error: nil)
            } catch {
                processClassifications(for: classificationRequest, error: error)
            }
        }
    }

    private func processClassifications(for request: VNCoreMLRequest, error: Error?) {
        guard let results = request.results else {
            self.classificationLabel = "Could not classify the image."
            self.confidence = "_"
            return
        }

        let classifications = results as! [VNClassificationObservation]

        if classifications.isEmpty {
            self.classificationLabel = "Nothing recognized."
            self.confidence = ""
        } else {
            let topClassifications = classifications.prefix(2)
            let descriptions = topClassifications.map { classification in
                "\(classification.identifier): \(Int(classification.confidence))%"
            }
            self.classificationLabel = "Classification:\n" + descriptions.joined(separator: "\n")
        }
    }

    private lazy var classificationRequest: VNCoreMLRequest = {
        do {
            let model = try VNCoreMLModel(for: DogBreedClassifier().model)
            let request = VNCoreMLRequest(model: model)
            request.imageCropAndScaleOption = .centerCrop
            return request
        } catch {
            fatalError("Failed to load Core ML Model: \(error)")
        }
    }()
}
- Add the below content to
ContentView.swiftfile
import SwiftUI

struct ContentView: View {
    @StateObject private var viewModel = ImageClassifierViewModel()
    @State private var selectedImage: UIImage?
    @State private var showImagePicker = false
    @State private var sourceType: UIImagePickerController.SourceType = .photoLibrary

    var body: some View {
        VStack(spacing: 20) {
            if let image = selectedImage {
                Image(uiImage: image)
                    .resizable()
                    .scaledToFit()
                    .frame(height: 300)
                    .cornerRadius(12)
                    .shadow(radius: 5)
            } else {
                Rectangle()
                    .fill(Color.gray.opacity(0.2))
                    .frame(height: 300)
                    .overlay(Text("No Image Selected").foregroundColor(.gray))
            }

            VStack(alignment: .leading, spacing: 8) {
                Text(viewModel.classificationLabel)
                    .font(.headline)
                    .multilineTextAlignment(.leading)
            }
            .padding()
            .background(Color(.systemGray6))
            .cornerRadius(10)

            HStack {
                Button("Camera") {
                    sourceType = .camera
                    showImagePicker = true
                }
                .buttonStyle(.borderedProminent)

                Button("Photo Library") {
                    sourceType = .photoLibrary
                    showImagePicker = true
                }
                .buttonStyle(.bordered)
            }
        }
        .padding()
        .sheet(isPresented: $showImagePicker) {
            ImagePicker(image: $selectedImage, sourceType: sourceType)
                .onDisappear {
                    if let image = selectedImage {
                        viewModel.classify(image: image)
                    }
                }
        }
    }
}

#Preview {
    ContentView()
}
- And, add below content to
ImagePicker.swiftfile
import SwiftUI
import UIKit
import UniformTypeIdentifiers
struct ImagePicker: UIViewControllerRepresentable {
@Binding var image: UIImage?
@Environment(\.dismiss) private var dismiss
let sourceType: UIImagePickerController.SourceType
var allowsEditing: Bool = false
func makeUIViewController(context: Context) -> some UIViewController {
let picker = UIImagePickerController()
// Check if the requested source is available (important for simulators and some devices
if UIImagePickerController.isSourceTypeAvailable(sourceType) {
picker.sourceType = sourceType
} else {
picker.sourceType = .photoLibrary
}
// Limit to images only (prevents videos from appearing)
picker.mediaTypes = [UTType.image.identifier]
picker.allowsEditing = allowsEditing
picker.delegate = context.coordinator
return picker
}
func updateUIViewController(_ uiViewController: UIViewControllerType, context: Context) {
// No updates needed
}
func makeCoordinator() -> Coordinator {
Coordinator(self)
}
@MainActor
class Coordinator: NSObject, UIImagePickerControllerDelegate, UINavigationControllerDelegate {
let parent: ImagePicker
init(_ parent: ImagePicker) {
self.parent = parent
}
func imagePickerController(_ picker: UIImagePickerController, didFinishPickingMediaWithInfo info: [UIImagePickerController.InfoKey : Any]) {
// Support both edited and original images
if parent.allowsEditing, let edited = info[.editedImage] as? UIImage {
parent.image = edited
} else if let original = info[.originalImage] as? UIImage {
parent.image = original
}
picker.dismiss(animated: true)
parent.dismiss()
}
func imagePickerControllerDidCancel(_ picker: UIImagePickerController) {
picker.dismiss(animated: true)
parent.dismiss()
}
}
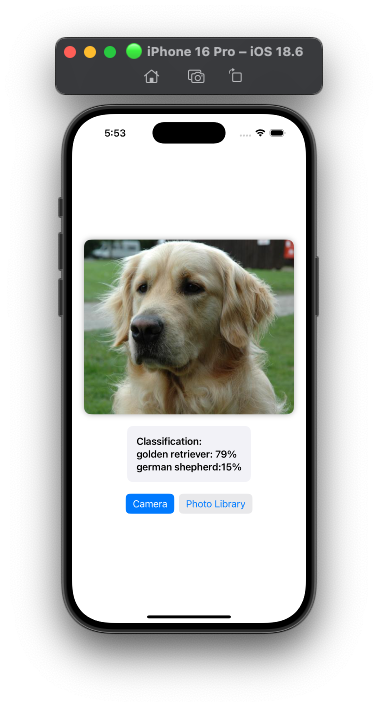
}When you run the app and choose a dog picture, you should see something like this (:
8. Conclusion
So, we built a mlmodel that classifies dog images and used it for making an app. The possibilities here are more.
If you observe the mlmodel file is less than 1 MB. With this kind of models and on-device Machine Learning, the applications are endless.
Have a look at Small Language Models.