ML with Swift - Create ML Text Analysis

Before you start, have a look at
Apple’s powerful Core ML, Create ML frameworks with Swift is a great option for adding machine learning to your projects. In this post, we’ll dive into how you can use Swift’s speed and type safety to train and integrate machine learning models right into your apps-no need to leave your favorite language behind.
What is Create ML
Create ML is Apple’s easy-to-use tool that lets you train machine learning models right on your Mac. It’s designed so anyone-even if you’re new to machine learning-can build smart Core ML models without much hassle. With Create ML, you can train models for things like recognizing images or sounds, detecting objects, analyzing text, tracking activities, and more, all through a simple app or by writing a bit of Swift code.
Why Create ML Is Primarily Available on macOS and Playgrounds
Create ML is designed as a tool for training machine learning models with a focus on ease of use, integration with Apple’s development tools, and leveraging the hardware capabilities of the Mac.
Reasons for macOS and Playground Focus
- Hardware Requirements: Training machine learning models, especially with large datasets or complex architectures, is computationally intensive. Macs provide the necessary CPU and GPU resources, which are better suited for model training compared to most iOS or iPadOS devices.
- Development Workflow: Create ML is tightly integrated with Xcode and macOS Playgrounds, allowing developers to easily experiment, visualize data, and iterate on models within the familiar Mac development environment.
- User Interface: The Create ML app and its playgrounds provide a graphical interface for data inspection, model configuration, and results visualization, which is optimized for macOS.
Why Not on iOS or iPadOS?
- Resource Constraints: iOS and iPadOS devices are generally optimized for battery life and responsive user experiences, not for the heavy workloads required by model training. Running Create ML’s full capabilities on these devices could lead to performance issues or excessive battery drain.
- App Distribution and Security: Allowing arbitrary code execution and data manipulation for model training on iOS/iPadOS would raise security and sandboxing challenges not present on macOS, where users have more control over their environment.
- Intended Use Case: Apple’s primary use case for Create ML is for developers to train models on their Mac and then deploy the trained models to iOS, iPadOS, or other Apple platforms for inference (prediction), which is much less resource-intensive.
Create ML APIs on iOS/iPadOS
While the full Create ML app and playground experience is not available on iOS/iPadOS, some Create ML APIs are technically available as Swift frameworks on these platforms, allowing for limited programmatic model training-primarily for simple or small models, and not with the same feature set as on macOS. However, this is not the typical workflow and is less documented and supported. For most practical purposes, model training is expected to be done on a Mac.
| Platform | Full Create ML App | Playground Support | Programmatic API Support | Model Training Practicality |
|---|---|---|---|---|
| macOS | Yes | Yes | Yes | Full |
| iOS/iPadOS | No | Limited | Limited (API only) | Limited, not typical |
In summary, Create ML is available primarily on macOS and macOS Playgrounds because of hardware, workflow, and platform security reasons. While some programmatic APIs exist for iOS/iPadOS, full-featured model training is intended for the Mac.
Why Swift for Machine Learning?
- Performance Swift compiles to native code, offering excellent performance for ML inference
- Type Safety Strong typing helps catch errors at compile time
- Ecosystem Integration Deep integration with Apple’s ML frameworks (Core ML, Create ML, Vision etc.)
- Native iOS/macOS Integration Direct deployment to Apple devices with hardware acceleration
- Developer Experience Familiar syntax for iOS developers entering ML space
Building a Custom ML Model with Create ML
In this Create ML example, we will make training data and train a model. Create ML allows you to train models directly in Swift. This example of training a text classifier to help Sheldon to detect sarcasm 😃 .
 |  |  |
Since Swift for TensorFlow was discontinued, we can create custom ML models using Create ML app or programmatically. In this post we will use the app.
Using Create ML app for Custom Models
- Open Crate ML app : Open Xcode
>Open Developer Tool>Create ML
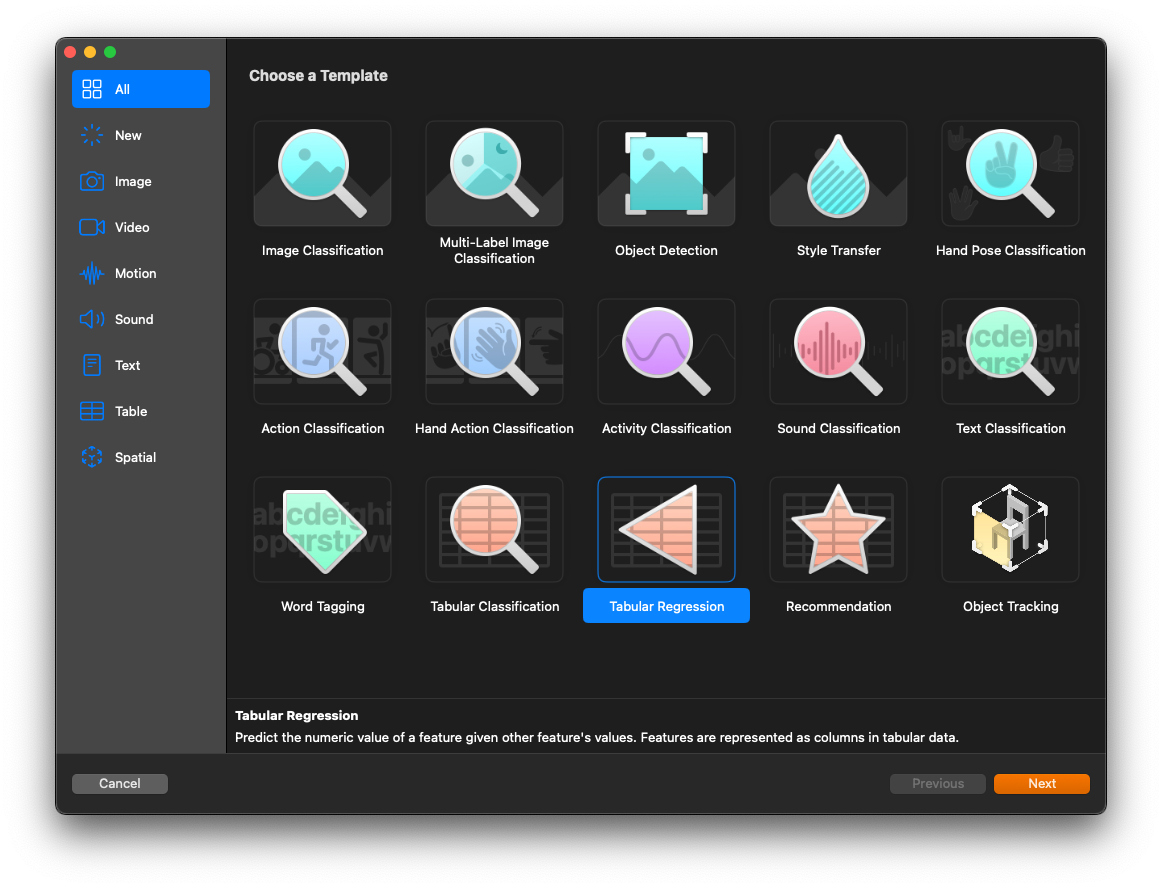
- Click on Next and create a project
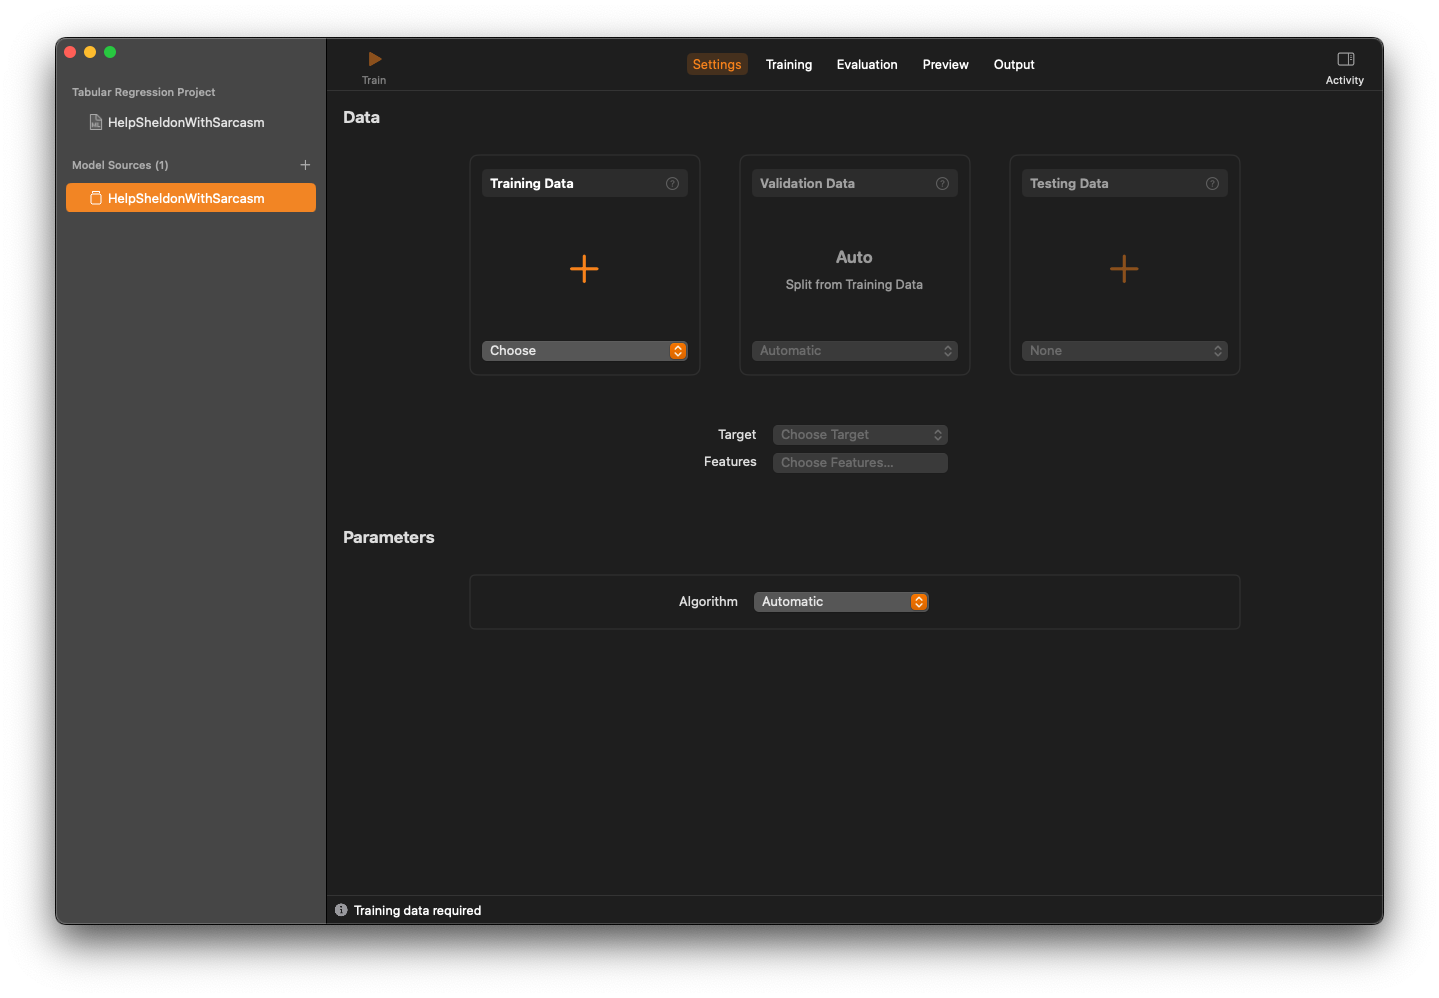
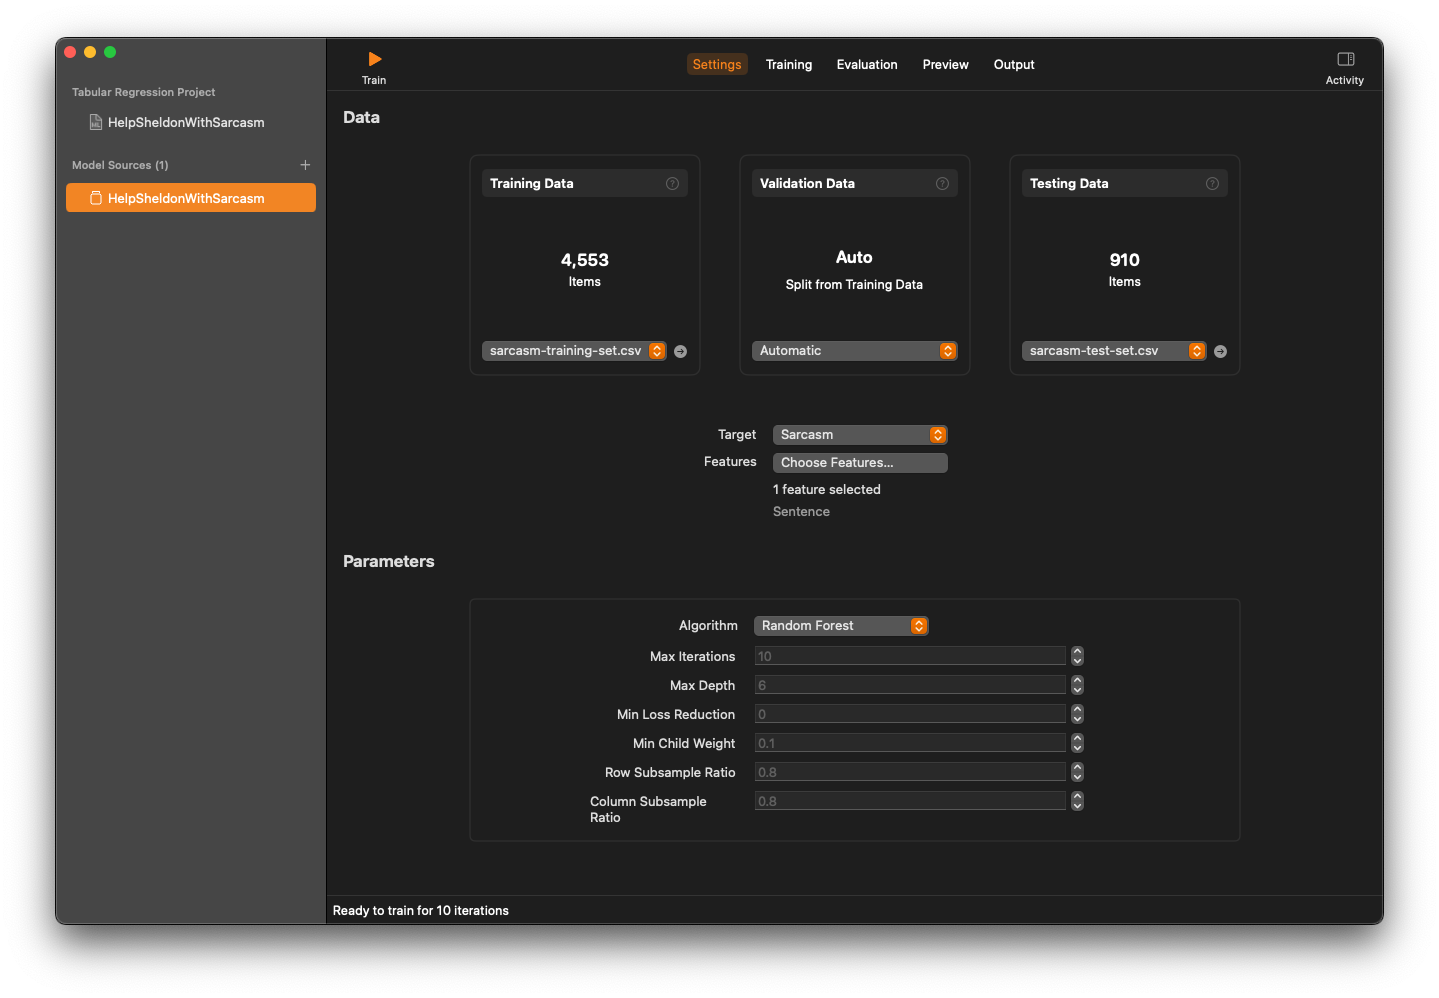
Here, you see sections - Data and Parameters with multiple parameters. This sections needs Training Data, Validation Data and Testing Data sets to be added. Before we prepare the sets, let us see what are these?
Data Sets
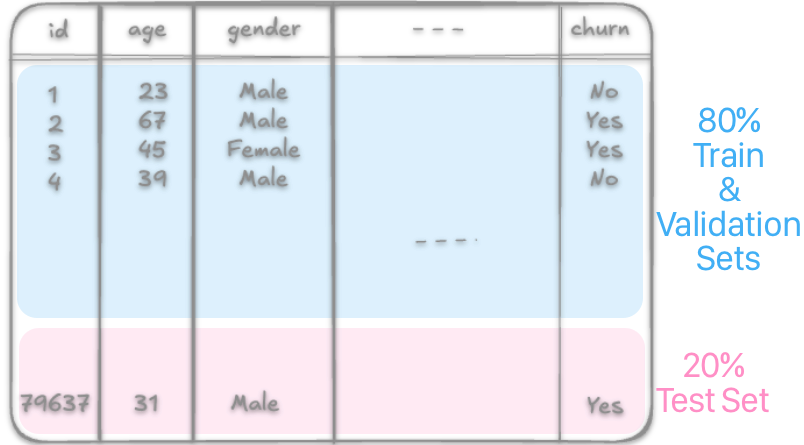
Training Data
Training data is the dataset used to teach a machine learning model how to make predictions or classify information. It contains input examples along with their correct outputs. The model learns patterns and relationships from this data. Typically, this is the largest portion of your dataset, often around 70-80%.
Validation Data
Validation data is a separate subset used during the training process to fine-tune the model. The validation set acts as a checkpoint to ensure the model is generalizing well.
Testing Data
Testing data is for evaluating the final model after training and validation are complete. It provides an unbiased measure of how the model will perform.
Importantly, this Testing Data is never used during training or tuning, ensuring an accurate assessment of the model’s true predictive capabilities.
| Dataset Type | Purpose | When Used | Typical Split (%) |
|---|---|---|---|
| Training Data | Teach the model to recognize patterns and learn | During training | 70-80 |
| Validation Data | Tune model, prevent overfitting, select hyperparams | During training | 10-20 |
| Testing Data | Evaluate final model performance | After training ends | 10-20 |
Prepare the Data Sets
Go ahead and download this sarcasm dataset csv file. The structure of it (in tabular manner) would be like this.
| Sentence | Sarcasm |
|---|---|
| USER reply via blacyeaherry messenger ya renee hihi | 0 |
| ohh how i love being forgotten | 1 |
| i just love feeling disrespected | 1 |
We will use this file for preparing all the three training, validation and test data sets. Run the below commands on Terminal to extract the content
- Training Data Set: We extract 80% of the data
head -n $(( $(wc -l < sarcasm-dataset.csv) * 80 / 100 )) sarcasm-dataset.csv > sarcasm-training-set.csv - Validation Data Set: We exctract 20% of the data from
sarcasm-training-set.csv. We can useshufcommand to randomly pick lines too. But this works for this example.tail -n $(( $(wc -l < sarcasm-training-set.csv) / 5 )) sarcasm-training-set.csv > sarcasm-validation-set.csv - Test Data Set: We extract 20% of the data from end of the file (
tail). Remember we should not have test data that is common with training data.tail -n $(( $(wc -l < sarcasm-dataset.csv) / 5 )) sarcasm-dataset.csv > sarcasm-test-set.csv
Feed the Data Sets
Go ahead and feed the relevant data sets in the Data. Now, we need to choose Target and Features.
What are Features and Targets?
In machine learning, features and targets are like the main characters in the story of prediction. When you train a machine learning model, you show it lots of examples with both features and targets, so it can learn the relationship between them and make predictions on new, unseen data.
Features are the details or characteristics about each example in your data that help the model make a decision. Think of features as clues: in a dataset about houses, features might be the number of bedrooms, square footage, or location. These are also called inputs, attributes, or independent variables-basically, they’re the parameters you already know about each example. In our data set, Sentence would be the feature.
Targets (sometimes called labels or outputs) are what you want the model to figure out or predict. In the house example, the target could be the price of the house. The target is the answer you’re looking for, and the whole point of the model is to learn how to go from the features (the clues) to the target (the answer). In our data set, Sarcasm would be the target.
In short,
- Features: The information you give the model (the clues).
- Target: The result you want the model to predict (the answer).
Parameters and Algorithm
Now, in the Parameters section of the Create ML form, we need to choose an Algorithm to train the model. The provided options are
- Automatic
- Random Forest
- Boosted Tree
- Decision Tree
- Linear Regression
What algorithm to choose
With our sarcasm-detection ML model, we want to tell if a given text is sarcastic or not. Our model’s output is a simple Yes or No. If we want your machine learning model to output a simple “yes” or “no” (i.e., a binary classification), we should use algorithms designed for classification tasks rather than regression.
Here’s a breakdown of our options:
Algorithm Suitability for Yes/No Output
| Algorithm | Suitable for Yes/No? | Notes |
|---|---|---|
| Decision Tree | Yes | Simple, interpretable, but can overfit on complex data. |
| Random Forest | Yes | Ensemble of decision trees, more robust and accurate. |
| Boosted Tree | Yes | Ensemble method, often achieves high accuracy. |
| Linear Regression | No* | Designed for predicting continuous values, not binary classes. |
*Linear regression is not intended for classification, though it can be adapted (with thresholding), but this is not recommended compared to dedicated classification algorithms.
Recommended Algorithms
- Decision Tree: Good for simple, interpretable models. Outputs a clear yes/no, but can overfit if your data is complex.
- Random Forest: Averages predictions from many decision trees, reducing overfitting and improving accuracy. Well-suited for binary classification and robust to noise.
- Boosted Tree: Sequentially builds trees to correct errors, often achieves state-of-the-art performance for yes/no classification.
Not Recommended
- Linear Regression: Not designed for classification; use logistic regression or one of the tree-based classifiers above for binary outputs.
So, as shown in the above screenshot, choose Random Forest. What about the parameters of the Random Forest? Those parameters are from Hyperparameter Tuning. It will be discussed in another post. For now, we can keep the default parameters.
Now, go ahead and click on the Train button on top. You should see that training is completed. And, we got our model trained, just like that.

Explore the other tabs and proceed to the last tab Output. Download the model by clicking on Get button.
Time to use the model in an app

Add our model file to the app
- Create an empty project in Xcode
- Add the model that we created to the project
- Add a
SarcasmClassifier.swiftfile to your project and add this code to it. ```swift import CoreML
// MARK: - Image Classifier Class
class SarcasmClassifier {
    private var model: MLModel?

    init() {
        setupModel()
    }

    private func setupModel() {
        // Using HelpSheldonWithSarcasm - make sure you have the .mlmodel file in your project
        guard let modelURL = Bundle.main.url(forResource: "HelpSheldonWithSarcasm", withExtension: "mlmodelc"), let mlModel = try? MLModel(contentsOf: modelURL) else {
            print("Failed to load HelpSheldonWithSarcasm model")
            return
        }
        self.model = mlModel

        // Print model description to see available features
        let modelDescription = mlModel.modelDescription
        print("Model Input Features:")
        for feature in modelDescription.inputDescriptionsByName {
            print("- \(feature.key): \(feature.value.type)")
        }
        print("\nModel Output Features:")
        for feature in modelDescription.outputDescriptionsByName {
            print("- \(feature.key): \(feature.value.type)")
        }

        print("Model Description: \(modelDescription)")
    }

    /// Classifies whether a given text contains sarcasm
    /// - Parameter text: The input text to analyze
    /// - Returns: A tuple containing the prediction (true for sarcastic, false for not sarcastic) and confidence score
    func classifySarcasm(in text: String) -> (isSarcastic: Bool, confidence: Double)? {
        guard let model = self.model else {
            print("Model not initialized")
            return nil
        }

        do {
            // Create a dictionary with the input text using the correct feature name
            let input = ["Sentence": text]
            print("Using input feature: Sentence")

            // Make prediction
            let prediction = try model.prediction(from: MLDictionaryFeatureProvider(dictionary: input))

            // Print available output features
            print("Available output features:")
            for feature in prediction.featureNames {
                print("- \(feature)")
            }

            // Get the prediction results using the correct output feature name
            if let sarcasmPrediction = prediction.featureValue(for: "Sarcasm")?.doubleValue {
                return (sarcasmPrediction > 0.5, sarcasmPrediction)
            }
        } catch {
            print("Error making prediction: \(error)")
        }

        return nil
    }
}
- In your ViewController file, after you build the UI the way you wanted, you can add this code to fetch result from SarcasmClassifer class.
// Create classifier instance
let classifier = SarcasmClassifier()

// Get prediction
if let result = classifier.classifySarcasm(in: text) {
    // Update UI with results
    lblConfidence.text = "Confidence: \(String(format: "%.2f", result.confidence * 100))%"

    // Update image based on prediction
    img.image = result.isSarcastic ? UIImage(named: "sarcasm") : UIImage(named: "nsarcasm")
} else {
    // Show error if prediction failed
    let alert = UIAlertController(title: "Error", message: "Failed to analyze text", preferredStyle: .alert)
    alert.addAction(UIAlertAction(title: "OK", style: .default))
    present(alert, animated: true)
}
- Go ahead, run test your app and play with it.
Best Practices
- Model Size Management: Keep models under 50MB for app store optimization
- Error Handling: Always handle model loading and prediction failures gracefully
- Privacy: Process sensitive data on-device when possible
- Testing: Create comprehensive unit tests for your ML pipeline
- Monitoring: Track model performance and accuracy in production
Conclusion
Swift provides a powerful platform for machine learning development, especially for Apple ecosystem applications. Whether you’re using Core ML for inference, CreateML for training, or building custom solutions, Swift’s performance and type safety make it an excellent choice for ML projects.
The combination of Swift’s modern language features with Apple’s optimized ML frameworks creates opportunities for building intelligent, responsive applications that can leverage the full power of Apple’s hardware, including the Neural Engine.
Start experimenting with these examples and explore how machine learning can enhance your Swift applications!